Yields:
12
Prep Time:
20 mins
Total Time:
1 hr 55 mins
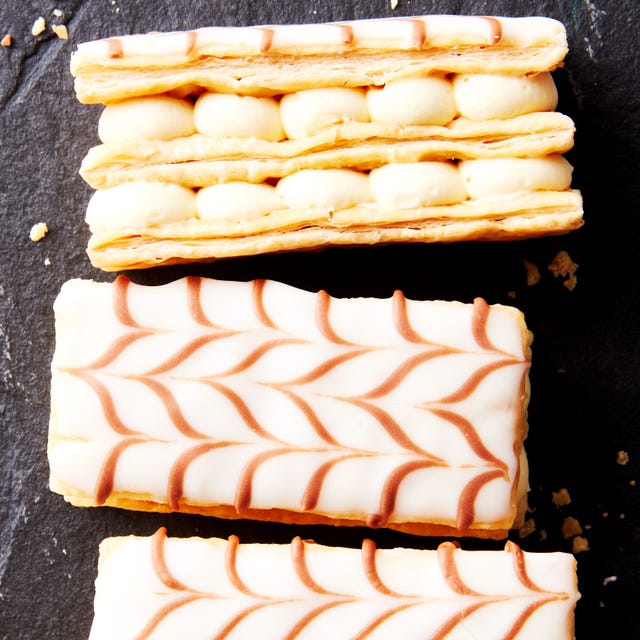
Want to make your kitchen look like a Parisienne pastry shop window? Make mille-feuille. Featuring layers of crisp, flakey puff pastry and smooth vanilla pastry cream, these delicate desserts are as stunning to look at as they are beautiful to eat. Read on for tips for how to make them.
The puff pastry layers:
Since the name “mille-feuille” is French for “thousand leaves,” layers of beautifully golden brown puff pastry are key here. Unless you have several days, a heavily air conditioned-kitchen, and a lot of butter to use, I don’t recommend making your own puff pastry here; store-bought brands such as Dufour or Pepperidge Farm will be just fine.
As with any puff pastry recipe, it’s important to thaw the pastry gradually in the refrigerator overnight and keep the pastry cold while you’re rolling out and cutting it. If the pastry becomes too warm, it will pull out of shape, and you’ll lose the precision of the pastry rectangles. This will make the assembled mille-feuille look less tidy when assembled—though they’ll still be delicious. I also recommend chill the pastry before baking; 15 minutes in the refrigerator should be just fine.
Weighing the puff pastry down with a second baking sheet while it cooks might seem counterintuitive (it’s puff pastry—don’t you want it to puff?), but there’s solid reasoning behind it. The second baking sheet compresses the pastry as it bakes, forcing it into flat, even (but just as flaky!) layers, perfect for supporting the pastry cream filling. Don’t go rogue and try to leave that second baking sheet off: Trust me when I say it won’t work.
The cream filling:
Mille-feuille are classically filled with creme diplomat, which is essentially a pastry cream (stovetop vanilla pudding) that has whipped cream folded into it. If you’ve never made a pastry cream, now’s the time to try. Made from seven basic ingredients (that you probably have already at home), it takes less than 10 minutes to make and is WORLDS better than any packaged vanilla pudding you’ve ever tasted. Taste it once and you’ll never go back.
The assembly:
Assembling and decorating these mille-feuille can be as simple as you like. I generally prefer to pipe my filling because it (actually!) feels easier to me, but if you prefer you can spread the filling over the pastry with a butter knife or an offset spatula.
Classically, these mille-feuille are topped with white and brown frosting in a “feathered” pattern. This is a surprisingly simple technique that involves piping strips of cocoa icing stripes across the still-wet white icing, then dragging a toothpick back and forth to create the chevron or “feathered” appearance. I was actually shocked at how dead easy this was the first time I did it, and I promise that if you attempt it, you’ll be truly delighted at how gorgeous it looks. But if you don’t have the time or want to keep it simple, you can also just ice the tops in plain white.
Make ahead:
Mille-feuille are best eaten the same day they’re assembled, since the pastry cream filling will begin to seep into the puff pastry and make it soggy as it sits; however, both the puff pastry layers and the pastry cream (without the whipped cream) can be made up to 1 day in advance. Either leave the pastry cream wrapped in plastic wrap on the sheet tray or transfer it to an airtight container and refrigerate. The puff pastry rectangles, once they’re cooled, can be stored in an airtight container at room temperature.
Advertisement - Continue Reading Below
Ingredients
Pastry Cream Filling
- 3
large egg yolks
- 3 Tbsp.
cornstarch
- 1/4 tsp.
kosher salt
- 6 Tbsp.
granulated sugar, divided
- 1 1/2 cups
whole milk
- 2 Tbsp.
unsalted butter, cubed, room temperature
- 1 1/2 tsp.
pure vanilla extract
- 3/4 cup
cold heavy cream
Puff Pastry Layers
- 1
(1-lb.) package puff pastry
All-purpose flour, for dusting
Assembly
- 1/2 tsp.
pure vanilla extract
- 2 1/4 cups
(270 g.) confectioners’ sugar, divided
- 4 Tbsp.
whole milk, divided
- 1 Tbsp.
unsweetened cocoa powder
Equipment Needed
- 2
piping bags, a 1/4" round tip, and a 1/2" round tip
Directions
Pastry Cream Filling
- Step 1In a large heatproof bowl, whisk egg yolks, cornstarch, salt, and 3 Tbsp. granulated sugar.
- Step 2In a medium pot over medium heat, heat milk and remaining 3 Tbsp. granulated sugar, stirring, until sugar is dissolved and milk is steaming, about 3 minutes. Whisking constantly, pour half of hot sugar milk into egg mixture.
- Step 3Pour milk-egg mixture into pot and cook over medium heat, stirring constantly, until pastry cream boils and thickens to a pudding-like consistency, about 3 minutes. Remove from heat. Stir in butter and vanilla. Pour hot pastry cream onto a rimmed baking sheet and cover with plastic wrap, pressing directly onto pastry cream. Refrigerate until cold, at least 1 hour. (If making all in one day, bake puff pastry layers while waiting for pastry cream to cool.)
- Step 4When pastry cream is cool, in a large bowl, whisk heavy cream until stiff peaks form. Transfer cold pastry cream to another large bowl and stir until smooth. Stir one-quarter of whipped cream into pastry cream until combined. Using a rubber spatula, carefully fold in remaining whipped cream. Refrigerate pastry cream filling until ready to assemble.
- Step 5Make Ahead: Pastry cream (without whipped cream folded in) can be made 3 days ahead. Store in an airtight container and refrigerate.
Puff Pastry Layers
- Step 1Place a rack in center of oven; preheat to 400°. Line 3 baking sheets with parchment. Remove 1 sheet of puff pastry from refrigerator. On a lightly floured surface, roll out to a 12" x 12" square. Using a sharp knife or a pizza wheel, cut square into 3 (12" x 4") rectangles, then cut each rectangle into 6 (4" x 2") smaller rectangles.
- Step 2Transfer rectangles to prepared baking sheets, spacing about 1/2" apart. Repeat with remaining sheet of puff pastry. (If not baking immediately, refrigerate pastry on baking sheets until ready to bake.)
- Step 3Top one tray of pastry rectangles with another sheet of parchment and a second empty baking sheet (this will prevent the pastry from puffing too much).
- Step 4Bake pastry until browned and crisp, 15 to 20 minutes. Remove top baking sheet and parchment. Transfer rectangles to wire rack and let cool completely. Repeat with remaining trays of pastry.
- Step 5Make Ahead: Puff pastry rectangles can be baked 1 day ahead. Store in an airtight container at room temperature.
Assembly
- Step 1In a small bowl, whisk vanilla, 1 1/4 c. (150 g.) confectioners’ sugar, and 2 Tbsp. milk until smooth. Cover bowl with a damp paper towel until ready to use.
- Step 2In another small bowl, whisk cocoa powder and remaining 1 c. confectioners’ sugar and 1 Tbsp. plus 2 tsp. milk until smooth. Add more milk if needed until mixture is a stiff pipeable glaze consistency. Transfer to piping bag fitted with 1/4" round tip.
- Step 3Arrange 12 pastry rectangles on a wire rack set over a baking sheet. Using a small offset spatula or butter knife, spread white icing over entire top of a pastry rectangles.
- Step 4Carefully pipe 6 lines of chocolate icing crosswise on top of white icing, spacing each about 1/2" apart. Drag pointy end of a clean toothpick through center of icing from one short end to the other (at a perpendicular angle to chocolate icing lines). Repeat on either side of first line, dragging the toothpick in the opposite direction to create a chevron shape. Repeat with remaining 11 rectangles.
- Step 5Transfer pastry cream filling to another piping bag fitted with 1/2" round tip. Arrange 24 un-iced rectangles in pairs on a clean work surface (if rectangles are slightly uneven, try to pair up rectangles that are a similar size/shape). With the piping bag tip pointed straight down, pipe 2 rows of 5 dots (about 1/2 tsp. each) on each rectangle.
- Step 6Carefully stack paired rectangles one on top of each other so both cream fillings are facing up. Top with an iced rectangle.
- Step 7Serve immediately or refrigerate until ready to serve.
Advertisement - Continue Reading Below
Advertisement - Continue Reading Below
Advertisement - Continue Reading Below


